What OpenSSL is used for?
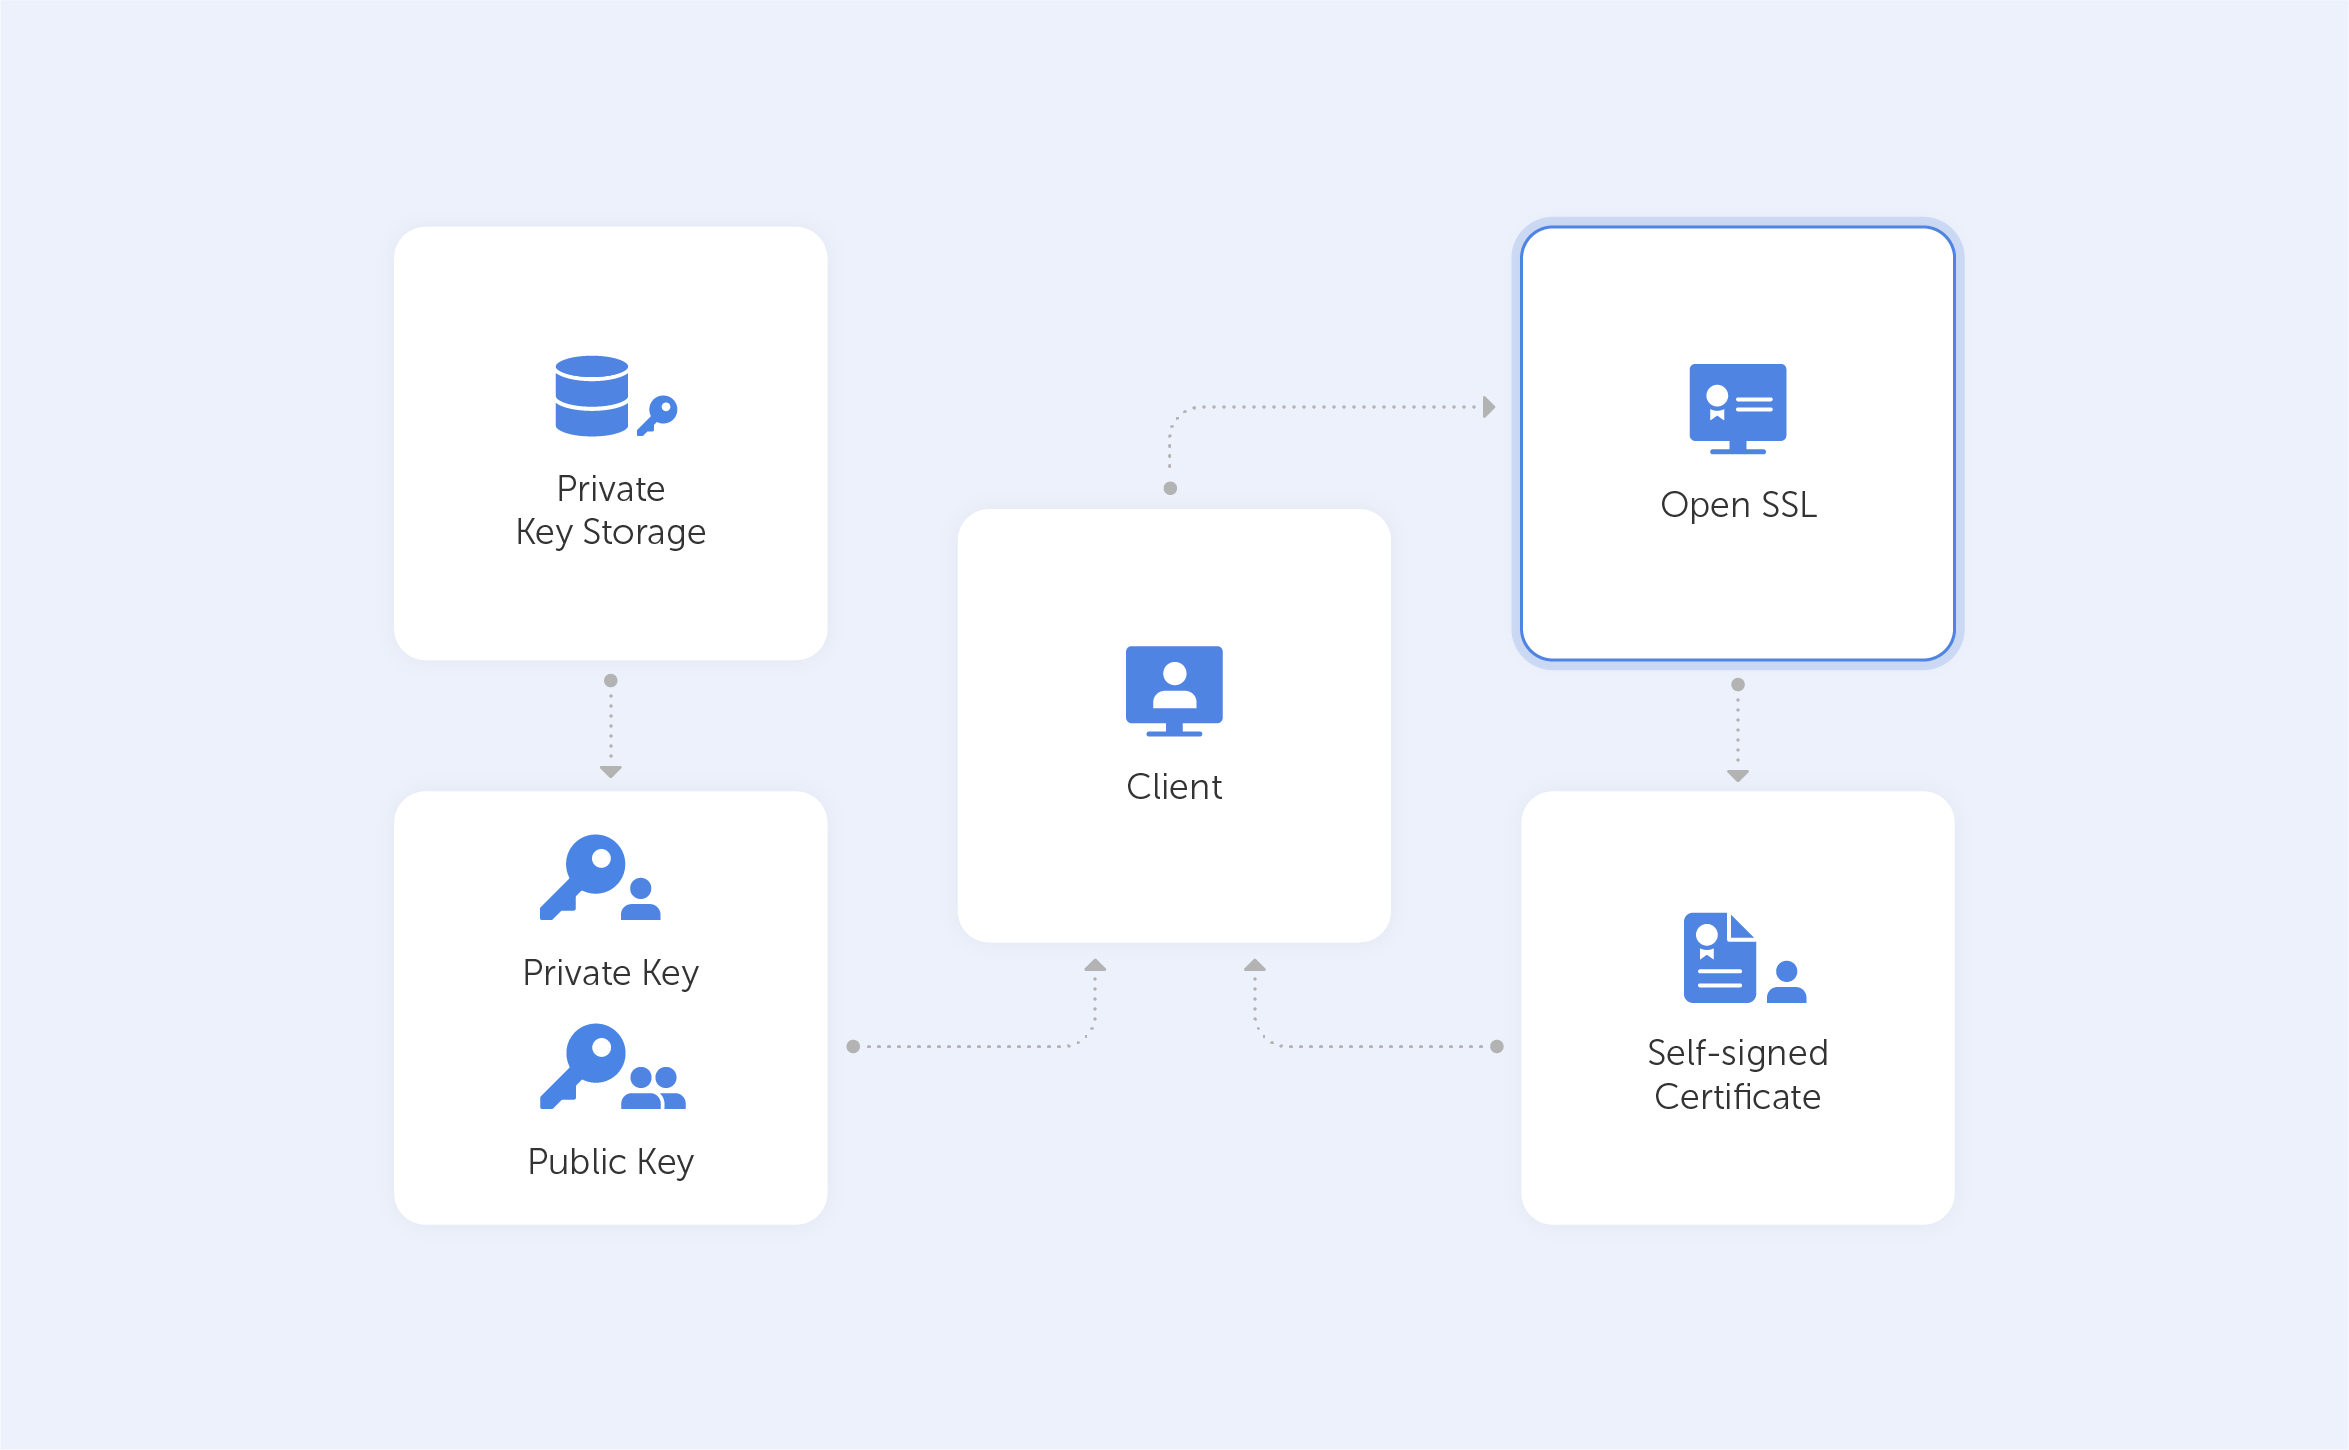
Most web servers across the internet and intranets alike use SSL certificates to secure connections. These certificates are traditionally generated by OpenSSL – a software library containing an open-source implementation of the SSL and TLS protocols. Basically, we’re looking at a core library, providing us with a variety of cryptographic and utility functions. Because of its ease-of-use and, most importantly, because it’s open-source (so, free), it managed to make its way to the top, and now, it’s the industry standard.
OpenSSL is available for Windows, Linux and MacOS. So, before you get started, make sure that you have OpenSSL installed on your machine. Here’s a list of precompiled binaries for your convenience. But, to be honest, the OS doesn’t really matter here too much – the commands are going to be identical in our case.
In this tutorial, we’ll show you how easy it can be to generate self-signed certificates with OpenSSL.
Such a self-signed certificate is great if you want to use HTTPS (HTTP over TLS) to secure your Apache HTTP or Nginx web server, and you know that your certificate doesn’t need to be signed by a CA.
How should I use OpenSSL?
OpenSSL is all about its command lines. Below, we’ve put together a few common OpenSSL commands that regular users can fiddle about with to generate private keys. After each command, we’ll try to explain what that exact line of code does by breaking it down into its constituent parts. If you fancy studying all of the commands, take a look at this page.
How can I generate self-signed certificates?
Let’s start! First and foremost, we want to check whether we have OpenSSL installed. To do that, we need to run:
openssl version -aIf you get something like this, you’re on the correct path:
OpenSSL 3.0.0 7 sep 2021 (Library: OpenSSL 3.0.0 7 sep 2021)
built on: Tue Sep  7 11:46:32 2021 UTC
platform: darwin64-x86_64-cc
options:  bn(64,64)
compiler: clang -fPIC -arch x86_64 -O3 -Wall -DL_ENDIAN -DOPENSSL_PIC -D_REENTRANT -DOPENSSL_BUILDING_OPENSSL -DNDEBUG
OPENSSLDIR: "/usr/local/etc/openssl@3"
ENGINESDIR: "/usr/local/Cellar/openssl@3/3.0.0_1/lib/engines-3"
MODULESDIR: "/usr/local/Cellar/openssl@3/3.0.0_1/lib/ossl-modules"
Seeding source: os-specific
CPUINFO: OPENSSL_ia32cap=0x7ffaf3bfffebffff:0x40000000029c67af
This code effectively specifies the SSL version that you have installed and some other details.
Now, the first important thing on our agenda is to generate a Public/Private keypair. To do this, we ought to punch in the following command:
openssl genrsa - out passwork.key 2048genrsa – is the command to generate a keypair with the RSA algorithm;
-out passwork.key – this is the output key file name;
2048– key size. Make sure to double-check your requirements at this stage, because that value may change depending on your use case.
Now we have the file ‘passwork.key’ in a directory that we’ve specified. Once we’ve created a file we can, for example, extract the public key by running:
openssl rsa -in passwork.key -pubout -out passwork_public.keyrsa – we ought to specify the algorithm that we used;
-in passwork.key – we take the existing keypair;
-pubout – here, we take only public key;
-out passwork_public.key – we’re exporting this as a file with name passwork_public.key.
Now we may proceed to creating a CSR – Certificate Signing Request. In a real production scenario, such a CSR is forwarded to the CA which signs it on your behalf, so you get a certificate. But for the sake of our tutorial, we’ll create a CSR and self-sign it.
The command to create a CSR is as follows:
openssl req -new -key passwork.key -out passwork.csrreq -new – here, we’re specifying that we want to create something new;
-key passwork.key – here, we’re specifying the key that we will use;
-out passwork.csr – here, we’re specifying the output file.
After pressing ‘Enter’ you’ll see something like this:
You are about to be asked to enter information that will be incorporated
into your certificate request.
What you are about to enter is what is called a Distinguished Name or a DN.
There are quite a few fields but you can leave some blank
For some fields, there will be a default value,
If you enter '.', the field will be left blank.
Enter the required data. For the purposes of our tutorial, we’ve entered the following fake values:
-----
Country Name (2 letter code) [AU]:US
State or Province Name (full name) [Some-State]:FL
Locality Name (eg, city) []:Tallahassee
Organization Name (eg, company) [Internet Widgits Pty Ltd]:Passwork
Organizational Unit Name (eg, section) []:.
Common Name (e.g. server FQDN or YOUR name) []:*.passwork.com
Email Address []:passwork@passwork.com
Please enter the following 'extra' attributes
to be sent with your certificate request
A challenge password []:
An optional company name []:
One of the most important fields is Common Name, which should match the server name or FQDN where the certificate is going to be used.
After all the above-mentioned steps, we’ll have our CSR file fully generated. In the real world, at this stage, we’d want to verify our CSR file, just so we’re not passing the wrong file to the CA. Also, it’s good practise to double-check whether the FQDN is correct.
Having all that in mind, we run:
openssl req -text -in passwork.csr -noout -verifyThe output, in our case, would be:
Certificate request self-signature verify OK
Certificate Request:
   Data:
      Version: 1 (0x0)
      Subject: C = US, ST = FL, L = Tallahassee, O = Passwork, CN = *.passwork.com, emailAddress = passwork@passwork.com
      Subject Public Key Info:
         Public Key Algorithm: rsaEncryption
            Public-Key: (2048 bit)
            Modulus:
               00:dd:c9:5a:27:82:00:0e:cc:43:c2:99:3a:e7:0a:
               b7:c2:96:06:f1:30:d6:3e:de:7c:6d:f1:98:66:cf:
               9d:8a:9c:09:43:a9:ab:59:0f:19:29:44:ec:2d:73:
               47:38:94:78:1b:4f:16:b6:4a:2b:45:55:0f:39:56:
               96:c3:53:e6:65:db:f7:91:b1:cb:36:e7:4b:cd:cd:
               bb:6b:36:9e:92:c9:5e:cc:09:de:f6:ca:43:66:14:
               21:b1:f9:37:56:22:6a:4f:3c:c5:08:5a:ab:81:19:
               88:a3:ee:87:9c:c6:1c:d5:42:71:35:33:cd:f4:ed:
               59:81:c6:eb:f3:02:da:43:e0:ce:f9:a5:6a:ca:d4:
               39:81:b3:17:68:4b:9a:a4:e0:41:55:c7:46:5d:38:
               05:f7:cc:7b:0b:80:b8:63:f4:91:81:d8:80:7c:00:
               11:e0:55:19:07:23:4a:5d:08:8e:8d:fc:c6:05:59:
               12:d1:7a:de:50:c4:d3:41:5f:b2:73:33:8b:2d:b7:
               80:a3:f4:66:b1:80:d1:22:01:71:b7:5d:75:a7:df:
               ae:e8:bd:22:32:30:71:54:56:ae:a6:b3:38:be:29:
               bb:af:be:01:65:fb:d4:66:84:b0:f0:fb:4b:58:c2:
               0e:3e:ee:9c:01:05:2e:02:7a:e1:42:71:c2:66:80:
               f7:27
            Exponent: 65537 (0x10001)
      Attributes:
         (none)
         Requested Extensions:
   Signature Algorithm: sha256WithRSAEncryption
   Signature Value:
      84:db:c8:7c:62:f3:54:85:c4:df:b9:c5:f5:2d:7a:c9:01:b1:
      2b:2b:69:a4:d6:ff:e8:8c:ef:39:dd:27:52:de:ba:58:67:5e:
      9a:37:c2:5c:2e:1c:58:7e:5b:f6:5d:cf:c5:f7:39:17:20:5f:
      82:bb:a5:52:bb:23:b9:b4:1a:c5:99:8d:1e:68:c9:1c:7e:a1:
      e1:39:9b:5e:b6:d4:22:17:38:fe:c8:8e:a5:82:da:ab:c9:ae:
      63:e6:42:5a:e0:09:50:a5:86:5a:8b:82:0c:0b:df:40:54:0d:
      9f:ec:b5:71:79:08:84:04:85:fc:6c:7b:63:38:37:b0:6d:20:
      10:2b:51:8a:dd:36:e6:92:c0:b6:9c:2e:86:c9:5a:55:3c:52:
      26:2b:8c:3d:80:35:fa:2a:40:c0:9e:d3:f2:e5:0e:78:e8:ea:
      d2:6f:ef:00:77:45:e5:1b:cc:df:da:52:b2:14:c9:23:09:f0:
      9b:5e:f5:9d:7d:df:e6:82:d1:b7:3a:a4:34:b5:df:bb:d6:fa:
      fe:85:47:6e:63:51:c3:d2:9d:11:43:16:2c:3e:df:44:0b:a7:
      08:1a:58:d5:f3:3d:49:a0:52:b7:6f:85:06:5d:da:3f:10:db:
      33:4f:71:38:6d:f6:e2:0e:ad:e1:74:35:27:09:a5:90:92:18:
      fc:96:30:54
As you can see, it lists crucial data that you provided when you answered questions related to the CSR. Check the values and if something is wrong – simply re-generate the CSR before you pass it on to the CA.
As we mentioned before, instead of passing our CSR to the CA, we’ll create a self-signed certificate. In order to do that, we ought to enter the following:
openssl x509 -in passwork.csr -out passwork.crt -req -signkey passwork.key -days 30The ‘X509’ command is our multi purpose certificate utility;
-in passwork.csr represents our CSR;
-out passwork.crt is the name and file extension for our certificate;
-req signkey passwork.key – here, we’re specifying the keypair that we want to use to sign our certificate;
-days 30 – this is an expiration time interval for our certificate.
The passwork.crt certificate file has now been generated, so it’s ready to go! Pretty easy, right? Well, it gets a lot easier when we remember that we can generate a self-signed certificate by just entering:
openssl req \
-newkey rsa:2048 -nodes -keyout passwork.key \
x509 -days 365 -out domain.crt
Here, a temporary CSR is generated, so we don’t have to enter all the data manually.
Please bear in mind that in real-life situations, you should follow best practice when creating a private key, they can be easily generated and therefore compromised.
Conclusion
We’ve barely touched the functionalities within OpenSSL, but as you can see, it’s not as complicated as many people first think – that’s why it’s loved far and wide. If you’ve still got any unanswered and burning questions, feel free to check out the frequently-asked questions (FAQ) page on the OpenSSL project’s website. If that’s not enough and you’re really looking for a deep dive – we can’t recommend this free e-book highly enough.
